Sunday, 16 October 2011

Scaffolding Baby Benches

I suppose they should be called footstools, but baby benches (baba bankies) just sounds so much more endearing.

We have plastic footstools scattered all over our house and I really wanted to replace them with something more aesthetic.  The kids for instance use them to reach the basin in the bathroom and to properly see on top of the kitchen counters.
The prepared scaffolding plank in my previous blog was just long enough for two of these little foot stools.
In calculating the dimensions, I used the proportions of the Golden Ratio (Golden Rectangle or Phi) for a pleasing and well balanced effect.  It is a ratio that is often repeated in nature and have been very successfully used in architecture, art etc over 1 000’s of years.  I actually attempted a blog post about the Golden Ratio and it’s uses in Interior Design but aborted the attempt for fear that I might irreversibly confuse you.  I’ll leave it to the experts to explain here or hear if you are interested. 
What I cán say is that I have used this Ratio very successfully when deciding on the placement of door knobs & handles, the proportions of a bookshelf,  a home made lamp etc.  It is something to fall back on and guaranteed to be pleasing on the eye.
That said, the planks where cut up and the rest where left to screws and woodglue. 


With the glue dry the stools got sanded very lightly to round the edges where they will be handled and to remove any obvious splinters.

I then used a threaded rod and some nuts to secure the legs a bit.....(placed at the height of the Golden Ratio)  just to ensure they will last for generations.  The rods and their stainless steel ornamental fasteners also add a little contemporary touch, just to balance out the rough texture of the wood.


So here they are,.... welcome to our home!


(Note: Our current terracotta floor does not compliment these stools at all.  If all goes according to plan we should have a white floor some time next year and the picture will come together.)

Friday, 14 October 2011

An ode to the Scaffolding Plank

Used Scaffolding Planks.  I get goose bumps when I think about them.  I am always looking out for them and I have a million things lined up to do with them.  In South Africa they are made of Pine and are 5 cms thick.  The cement from the construction sites almost fossilise them and gives them the softest grey/white patina you can imagine.  The ends of the rented ones are often painted in a beautiful faded Teal,.... to die for.

Together with that, the knicks and knocks they get on the building terrain just cannot be artificially added to a new plank.  The soft-to-the-touch rounded edges cannot be created with a sander without eating through the cement patina.  One thing is for sure, the fakes just don’t do it for me, it has to be the real thing.
That said, to get any builder to part with his beloved planks prove harder than you might ever imagine.  For some reason they are not even interested in a straight swop with a new plank.  Be prepared to use all your charm, leave Hubby at home, ... wear lipstick. 
Back to the planks.  If you get them for free, as I always aim for, they will be damaged.  That is not necessarily bad.  They might have a crack through the one end, but the other end might be perfectly fine.

Do not worry about storing them.  No rain or sun (we don't have snow) will ever damage them, so just leave them outside, lifted from the ground, in a flat position.
It is best to prepare them before you cut them up.  Firstly remove all visible nails with a crow bar and/or a hammer.  Also remove the metal parts that reinforce the ends, unless you want to keep them for effect. 

Secondly, you want to get rid of all the loose, powdery cement and any hard cement residues, but you do want to leave the patina.
You will need:  Spirits of Salts (Sout Suur), a brush, goggles, rubber gloves, protective clothing, running water for rinsing and a baby sitter. 

Meet the players!


Warning: Spirits of Salts is an industrial strength acid, it eats through skin (and probably clothing) that is not washed immediately after contact.  It also dissolves cement and gives off gas, so do not do this on your paved driveway and make sure your area is well ventilated.
Do not let the warning put you off, it is immensely satisfying to see this stuff bubble and do its job.  Rinse it off when the bubbling has stopped, usually after a minute or so but there is no rush to rinse it before you have done the whole plank on all sides and ends.

I’ve had planks with very resistant chunks of cement stuck to them.  Try and scrape the biggest pieces off... with something hard that looks like it’s meant to do this.  (not your kitchen knife,... find something in the garage).   It might then require a second coat.  As long as there is vicious bubbling when you apply the Spirits of Salts, there is cement that can come off. 
Also do not fear when you see the yellow wood appear when you rinse them, as soon as the plank is dry the powdery cement patina returns. 

This is a cleaned, wet plank.  The colour will change
 back to a white-grey when it is dry.
Your plank is now ready to be transformed.  More on that in a later post.

The 'Incubator'

My first attempt to plant beans where thwarted by the snails or some other creature that nibbled off their heads just as they popped out of the ground.  Most did not even see the light of day so it was time to improvise and give it another go.
A few days before planting, I put the beans in a saucer between two damp layers of kitchen towelling.  I kept them in a warm spot in the window sill and left them to sprout while keeping them moist.

For the Incubator I used an old Japanese style lamp in a derelict state. 


 I stripped off the coverings and fittings and covered the frame in a strong clear plastic.  Cable ties and duct tape did the trick here.
I then I filled two ice-cream tubs with a thin layer of rough gravel and added a layer of mosquito gauze to level the floor a bit... just because I had it.

If you work for a big Corporate and you ask the cleaner for 15 toilet rolls, you have them by lunchtime. 

I plugged them with newspaper balls and the kids filled them with soil. (Well, actually one of them was vaguely interested, filled about 4 and then ran off to do something else).


The sprouted beans where gently planted in the toilet rolls and covered with a thin layer of soil. 

I planted two types of beans and some other seeds as well, so I marked the rolls. Watered them and popped them in da incubator.


They got watered daily and on day three, much to my surprise, the first one ‘hatched’. 

I had to plant it out on day four as it had its head against the roof (Mmm, maybe I should get a bígger incubator...). 

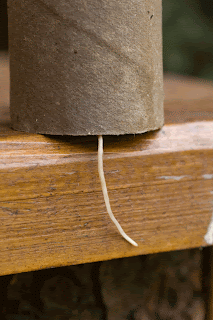
What surprised me most of all was this root that was hanging out of the bottom, just like a tail! 

On day five, three more had to be planted out and the rest where busy breaking soil in their toilet rolls.

The Marigolds (Afrikaners) also did very well. 


So far so good, lets see if they make it out there in the ‘big’ world of the Veggie patch.

Monday, 3 October 2011

Veggie Patch update

The Veggie patch is coming along very nicely. 


We've had some problems with snails and there is a very persistent cat in the neighbourhood that just loves the soft soil.  Hopefully the Citronella oil and húge 'pendorings' will sort him out quickly.


What a joy to walk out there every morning, pull a new weed or two and then start the day.


The garden has already spilled over into containers. 


As you can see, only one of the bean plants made it thanks to the snails.  Will be planting some more in the next few days.

Vintage Wooden Boxes - Part Two

About 3 weeks ago I visited a small industrial complex on the outskirts of Durbanville.  I stumbled  upon (literally) this old wooden crate where it was waiting for me lying outside a Church Organ Repairers workshop.
It had the most awkward dimensions (4.1m x 20cm x 20cm) but I immediately knew I could find a useful spot for it.  Apparently it was originally used to ship parts for church organs and it seems quite vintage.
This one had to get out of the garage quickly so last weekend I stabilised it with some 50 screws, lightly sanded it and then added 3 bars of threaded rod to further support the opening and stop it from gaping open in the middle.


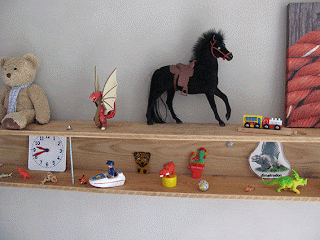
It was perfect for the boys’ room.  They need some shelving and it fits in with less than 10cms to spare on either side.
We put it up and what a transformation!


Now they just need real beds which will also allow them to reach the shelf and do their own arrangements of toys, but that is a post for another day.


Tuesday, 23 August 2011

Vintage Wooden Boxes - Part One

I have been collecting vintage wooden boxes since childhood.  I simply can’t resist them regardless of their condition.  I suppose it has something to do with the stories they can tell.  What have they been used for before?  Who did they belong to and where have they been?  One of my favourites belonged to my grandmother.  She used it to transport the eggs she sold for extra income and it still had some straw in it when we found it in their attic years ago.
Three of the sturdier boxes were kept in our garage where they were used to store “stuff” and I were given an ultimatum by The Father Person when he did the big garage clean-up a few weekends ago.  ’Use them, or lose them'.  There was no way they were going to be thrown out, so they got dusted and given some special TLC.

I painted the insides with that all time South African favourite, Velvaglo Enamel from Plascon.  It is hard wearing with a lovely velvety sheen finish. 

Two of them got a place on the kitchen counter and I am amazed by the change they make. One of them now holds (some of) my cookery books and the other is just sitting there, looking pretty.   I am so happy with them,  I can’t believe it took me so long to use them. 

This one (left) was picked up on a beach.  The wood has gone all woolly on the edges, it almost feels soft to the touch. 

Monday, 8 August 2011

The New Veggie Patch: Construction

Three weeks ago, we had no plans to start a Veggie Patch.  The "Father Person" wanted to plant tomatoes for the youngest in the brood (2yr 9mth) who love them, but previous attempts to grow them in a pot on the back balcony where futile.  It was a case of ''out of sight, out of mind' and the daily effort to go out there and care for them proved just to much for an already busy family.

I then started reading A Year in the Village of Eternity  and reading how those Italians live off their land, only consuming chemical free produce and have an average dying age of 93, I was really inspired.
Speaking to a few people I very quickly learnt that apart from 2 family members I also have 3 friends that successfully grow their veggies in their back yards.


Maybe, just maybe it is possible for us.  One Magic Square, convinced us we could and should and by Friday night the spot was selected. Saturday morning the materials where bought and by lunchtime it was all systems go.


I would have been happy to just have a right angled support to stop the water and soil running down hill, but after much deliberation, The Father Person convinced me an upside down U-shape was the most practical and aestheticly pleasing option. 


It was tough to get it level on a sloped site
Not only that, he constructed a state-of-the-art box, strong enough to withstand an earth quake, right angled, levelled, varnished and to top it all, rounded cladding! 


Adding the Cladding


Wow, this is much more than what I bargained for!  How is that for pressure, this box will have to perform!


Almost filled up


We are fortunate to have ample supply of good compost so with the last light on Sunday afternoon we started filling her up, also adding generous amounts of Bone Meal and Superphosphate.

Now back to the book to see what can be planted in late winter.